
Secure boot is a UEFI feature that prevents unauthorized operating systems and software from running during computer startup. That is, Secure Boot is not a feature of Windows 8 or Windows 10, but is only used by the operating system. And the main reason why it may be necessary to disable this function is that booting a computer or laptop from a USB flash drive does not work (although the bootable USB flash drive is made correctly).
As already mentioned, in some cases it becomes necessary to disable Secure Boot in UEFI (hardware setup software currently used instead of BIOS on motherboards): for example, this function may interfere with booting from a USB flash drive or disk when installing Windows 7, XP or Ubuntu and in other cases. One of the most common cases is the “Secure Boot not configured correctly” message on the Windows 8 and 8.1 desktop. How to disable this feature in different versions of the UEFI interface will be discussed in this article.
Note: if you came across this instruction in order to fix the Secure Boot is not configured correctly error, then I recommend that you first read this information.
Step 1 – Go to UEFI Settings
In order to disable Secure Boot, you first need to go to the UEFI settings (go to BIOS) of your computer. There are two main ways to do this.
Method 1. If your computer has Windows 8 or 8.1 installed, then you can go to the right panel in Settings – Change computer settings – Update and restore – Recovery and click the “Restart” button in the special boot options. After that, select advanced options – UEFI software settings, the computer will reboot immediately into the required settings.
Method 2. When turning on the computer, press Delete (for desktop computers) or F2 (for laptops, it happens – Fn + F2). I have indicated the commonly used key options, however, for some motherboards they may differ, as a rule, these keys are indicated on the initial screen when turned on.
Examples of disabling Secure Boot on different laptops and motherboards
Below are a few examples of disabling in different UEFI interfaces. These options are also used on most other motherboards that support this feature. If your option is not in the list, then look at the available ones and, most likely, there is a similar item in your BIOS to disable Secure Boot.
Asus motherboards and laptops
In order to disable Secure Boot on Asus hardware (its modern versions), in the UEFI settings, go to the Boot (Boot) tab – Secure Boot (Secure Boot) and in the OS Type item (Operating system type) set “Other OS” (Other OS), then save the settings (F10 key).
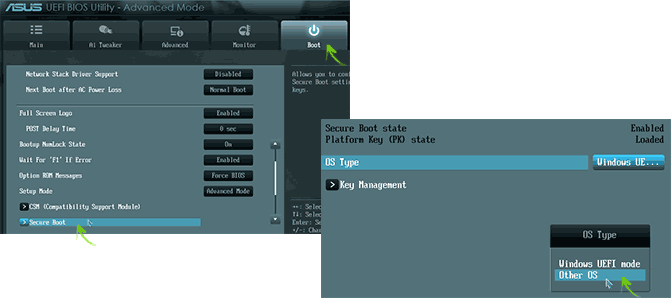
On some variants of Asus motherboards, for the same purpose, go to the Security or Boot tab and set the Secure Boot option to Disabled.
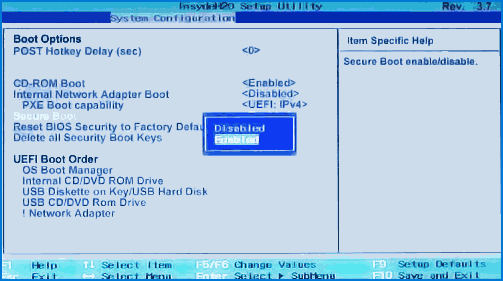
Disabling Secure Boot on HP Pavilion Notebooks and Other HP Models
To disable secure boot on HP laptops, do the following: immediately when you turn on the laptop, press the “Esc” key, a menu should appear with the ability to enter the BIOS settings using the F10 key.
In BIOS, go to the System Configuration tab and select Boot Options. At this point, find the “Secure Boot” item and set it to the “Disabled” state. Save your settings.
Lenovo and Toshiba laptops
To disable the Secure Boot function in UEFI on Lenovo and Toshiba laptops, go to the UEFI software (as a rule, you need to press the F2 or Fn + F2 key when turning it on).
After that, go to the “Security” settings tab and set “Disabled” in the “Secure Boot” field. After that, save the settings (Fn + F10 or just F10).
On Dell laptops
On Dell laptops with InsydeH2O, the Secure Boot setting is located in the “Boot” – “UEFI Boot” section (see screenshot).
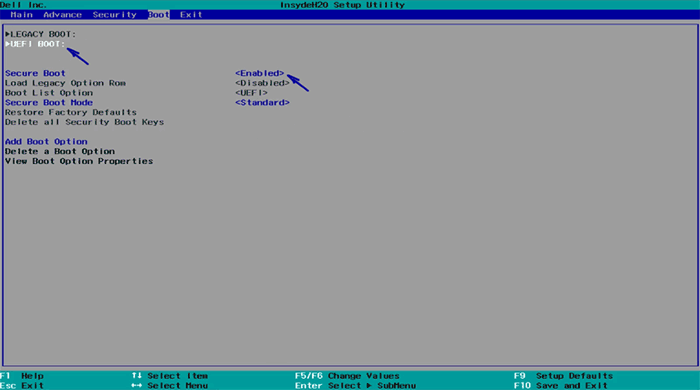
To disable Secure Boot, set the value to “Disabled” and save the settings by pressing the F10 key.
Disabling Secure Boot on Acer
The Secure Boot item on Acer laptops is located on the Boot tab of BIOS settings (UEFI), but by default you cannot disable it (set it from Enabled to Disabled). On Acer desktop computers, the same feature is disabled in the Authentication section. (It is also possible to be in Advanced – System Configuration).
In order for this option to be changed (only for Acer laptops), on the Security tab, you need to set a password using Set Supervisor Password, and only then will disabling secure boot become available. Additionally, you may need to enable CSM boot mode or Legacy Mode instead of UEFI.

Gigabyte
On some Gigabyte motherboards, disabling Secure Boot is available on the BIOS Features tab (BIOS settings).
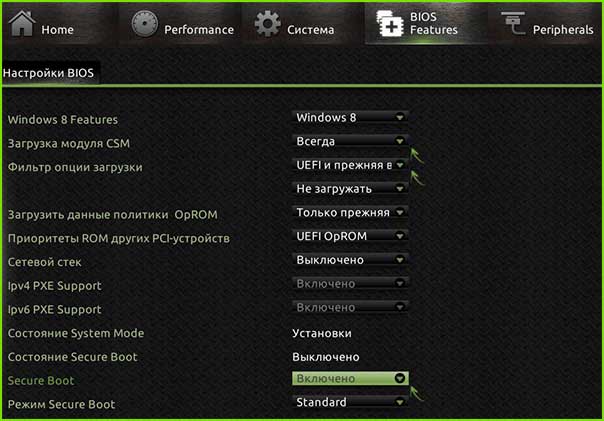
To start the computer from a bootable flash drive (not UEFI), you will also need to enable CSM boot and the previous boot version (see screenshot).
More shutdown options
On most laptops and computers, you will see the same options for finding the desired option as in the paragraphs already listed. In some cases, some details may differ, for example, on some laptops, disabling Secure Boot may look like choosing an operating system in BIOS – Windows 8 (or 10) and Windows 7. In this case, we select Windows 7, this is equivalent to disabling secure boot.
If you have a question about a particular motherboard or laptop, you can ask it in the comments, I hope I can help.
Advanced: How to find out if Secure Boot is enabled or disabled in Windows
To check if Secure Boot is enabled in Windows 8 (8.1) and Windows 10, you can press the Windows + R keys, type msinfo32 and press Enter.
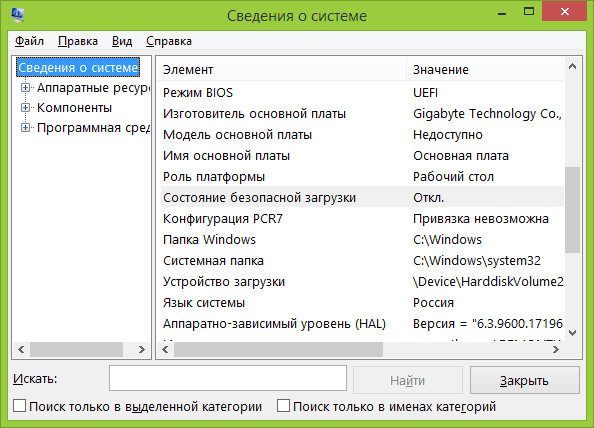
In the System Information window, by selecting the root partition from the list on the left, look for “Secure Boot Status” to see if this technology is enabled.